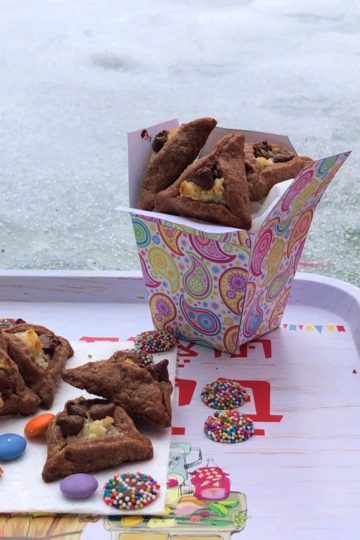
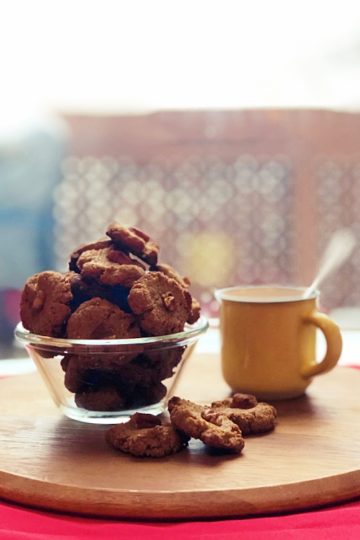
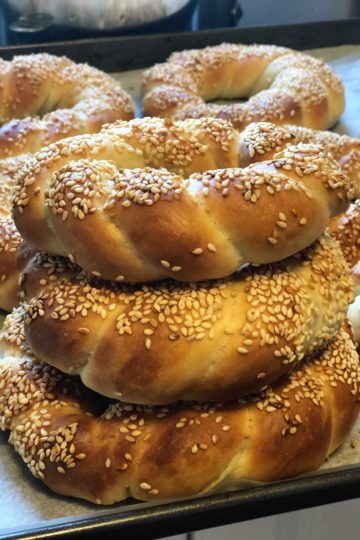
Breaded Baked Sole Fillets – Inspired by Gwenyth Paltrow

Dining Like a Star | Home Made Cooking 0

I was planning on making pasta for supper, honestly. But then I remembered the lonely mashed potato leftovers in the fridge, and leftovers or not I LOVE mashed potatoes. I can have them with an omelet, sour cream, cheese, chicken, veggies and just basically with anything. Whenever I want food that makes me feel comfort and warmth I turn to the mashed potatoes. But enough about the mashed potatoes, I needed something to go with it. We don’t tend to eat a lot of meat or chicken at home but I still needed something to go with the potatoes and then it hit me – fish! I only had sole fillets and although I love sole, the dishes I made in the past tasted good but looked kind of sad. I remembered watching a video on YouTube my husband sent me, showing Gwyneth Paltrow making one of her favorite recipes from her new cookbook “It’s All Good”. The book is all about egg, gluten, dairy (and so many more ingredients) free food, which is so much healthier, and in the video she was showing how to make baked fish nuggets. Remembering that video inspired me to make something similar but different myself. I always like to avoid frying when possible and tend to bake rather than fry, it’s so much more healthy this way and since I mostly serve to my kids I would naturally prefer it if they eat healthy. So what I did is take my sole fillets out of the freezer and without even thawing them, made supper. The fillets came out crunchy, full of flavor and were super easy to make, just the way I like it. So thanks Gwyneth for the inspiration.


Breaded baked sole fillets


Braded Baked Sole Fillets
Author: 
Recipe type: Main
Cuisine: Fish
Prep time: 
Cook time: 
Total time: 

Serves: 9 Fillets
 

Baked Sole Fillets never looked better. It’s so easy and much healthier than the fried version.
Ingredients
  • 9 Sole Fillets (Frozen or thawed)
  • 3 tbsp Mayonnaise
  • ½ tsp Dry Oregano
  • ½ tsp Garlic Powder
  • ¼ tsp Salt
  • 1 Cup Bread Crumbs

Instructions
  1. Preheat oven to 400F (200C)
  2. Line a large baking sheet with parchment paper
  3. In a medium bowl, mix the mayonnaise, oregano, salt and garlic powder together. Whisk until smooth and even.
  4. Place the bead crumbs in a plate for coating
  5. Dip both sides of the fillets in the mayonnaise batter until both sides fully covered with batter. You can also use a spoon to gently apply some batter on each side.
  6. Dip the batter covered fillet in the bread crumbs until fully coated on both sides
  7. Place on the prepared baking sheet and into the preheated oven for 15 minutes (depending on your oven this may take longer, you need the fillets to turn golden)
  8. After 15 minutes broil for another 4 minutes until golden brown


Breaded baked sole fillets

Breaded baked sole fillets

I was planning on making pasta for supper, honestly. But then I remembered the lonely mashed potato leftovers in the fridge, and leftovers or not I LOVE mashed potatoes. I can have them with an omelet, sour cream, cheese, chicken, veggies and just basically with anything. Whenever I want food that makes me feel comfort…

Read More

Baked Cheese Balls with Sundried Tomatoes

Baked Goodies 0

Sometimes I’m just looking for ways to make my life easier, like multitasking, like procrastinating and like baking instead of cooking.

This time I really wanted cheese balls but the ones you can usually find recipes for are the ones that mix a few kinds of cheese together, roll into a ball and serve with a nice piece of bread. Well, I wanted something different, I’m not sure why but these” raw” cheese balls are associated with either a fancy reception or breakfast in my head, so I had to come up with something different since I wanted to serve these for dinner.

After thinking about it, I decided to try and bake my cheese balls and make cheese bites.

So I decided I’d roll the balls in sesame, but of course I open the cupboard and see that I have maybe 1 tsp sesame left – great, now what?

I look above the sesame and I see a bag of walnuts – bingo! I can dice them in a food processor and voila! I get a walnut coating for my cheese bites. I mix, I roll, I coat, I bake, I hope, I cross my fingers and it works. I take the baked goodies out of the oven and they are beautiful and smell awesome. The kids taste test it and love it, the hubby gets it for dinner with a side of fresh salad and loves it. Well, I guess taking the short cut did work this time.

Baked Cheese Balls with sun dried tomatoes


Baked Cheese Balls with Sundried Tomatoes
Author: 
Recipe type: Appetizer
Cuisine: Vegetarian
Prep time: 
Cook time: 
Total time: 

Serves: 25 Balls
 

Easy to make and bake. Just serve with fresh vegetables on the side and it’s a party.
Ingredients
  • 75gr Cheese – Grated (1½ Cups)
  • ½ cup Cottage Cheese
  • ¼ cup Sun-dried Tomatoes – Chopped
  • 1 tsp Dry Basil
  • ½ tsp Dry Oregano
  • 5 tbsp Bread Crumbs
  • 1 Egg
  • Diced Walnuts or Sesame Seeds for coating

Instructions
  1. Preheat oven to 350F (175C)
  2. Mix all the ingredients together (except for the walnuts/ sesame) until fully combined
  3. Scoop mix with a teaspoon and roll into balls
  4. Roll the balls in the diced walnuts or sesame seeds and place on a parchment paper covered baking sheet
  5. Place in preheated oven for 15-20 minutes and serve


Baked Cheese Balls with sun dried tomatoes

Baked Cheese Balls with sun dried tomatoes

Sometimes I’m just looking for ways to make my life easier, like multitasking, like procrastinating and like baking instead of cooking. This time I really wanted cheese balls but the ones you can usually find recipes for are the ones that mix a few kinds of cheese together, roll into a ball and serve with…

Read More

Peanut Butter, Banana and Chocolate in Crunchy Phyllo Bags

Baked Goodies | Cakes and Cookies 0

This is not really a recipe per say, but rather an inspiration :)

I made some goodies using phyllo dough and had a bunch of phyllo leaves leftover so I had to play around with it, especially since this was the first time I’ve ever used this dough.

So first of all I want to say that it’s so easy and mess free, I just had fun playing with it. And second, it was simply amazing; everything I made with this dough turned out fantastic.

So I decided to make some dessert for us all last night and wanted it to be super fast. Now, what’s better than the ultimate combination of peanut butter, banana and chocolate? So that’s exactly what I did. combined them all, in phyllo leaves shaped into tiny bags. It took us about 5 minutes to finish all 9 pieces. It didn’t  even cool.


Peanut Butter Banana and Chocolate Phyllo


Peanut Butter, Banana and Chocolate in Crunchy Phyllo Bags
Author: 
Recipe type: Dessert
Cuisine: Desserts
Prep time: 
Cook time: 
Total time: 

Serves: 9 Phyllo Pastries
 

A great combination, a great idea! Super easy and looks fantastic. Oh, and wait until you taste it.
Ingredients
  • 2 Phyllo Dough leaves
  • Semi-Sweet Chocolate Chips
  • 1 Banana – Finely Cubed
  • Peanut Butter
  • 3 tbsp Butter – Melted

Instructions
  1. Preheat oven to 375F (190C)
  2. Place one phyllo leaf on your work surface
  3. Hold edge with one hand and brush melted butter onto dough leaf
  4. Once brushed with butter, cover the leaf with the second leaf
  5. Using a knife pizza roller knife, cut dough into 9 rectangles (3X3)
  6. in the middle of each rectangle place 1 flat tsp peanut butter, a few chocolate chips and a few banana cubes
  7. Fold 2 opposite rectangle edges toward the middle (like envelope) and then take the other 2 opposite edges and pinch them together right above the filling (phyllo dough box should have the instructions on it)
  8. Place on parchment paper covered baking sheet and brush with some melted butter on top
  9. Place in preheated oven for about 15 minutes or until brown and crisp on top
  10. Serve with whipped cream or ice cream


Peanut Butter Banana and Chocolate Phyllo


Peanut Butter Banana and Chocolate Phyllo

This is not really a recipe per say, but rather an inspiration I made some goodies using phyllo dough and had a bunch of phyllo leaves leftover so I had to play around with it, especially since this was the first time I’ve ever used this dough. So first of all I want to say…

Read More

Mini Blueberry Cheesecake

Cakes and Cookies 0

I’m not sure why but I always though that cheesecakes are complicated and that’s why I tried avoiding them, although I just love cheesecakes, I mean, who doesn’t?

So I decided to take advantage of the fact that these past few days were a Jewish holiday that focuses on eating dairy (“Shavuot”) and dived in, into cheese that is.

As usual, I made up my mind to use whatever I had in my fridge or freezer and luckily, I had blueberries. Now, when it comes to blueberries I admit, I’m like a child, I just love coloring food with them, wondering how purple my food would turn out. So I added the blueberries to the cheese and played around with the ingredients. The result was a great cheesecake with a nice crisp bottom and cheesy soft top. Of course I also made it in mini cheesecake form using my silicon muffin pan because well…I just don’t seen to have enough space in my fridge to store a whole cake. And to be honest, mini cheesecakes look so much better and are consumed so much faster.


Mini Blueberry Cheesecake with berries


Mini Blueberry Cheesecake
Author: 
Recipe type: Dessert
Cuisine: Cheese, Sweet
Prep time: 
Cook time: 
Total time: 

Serves: 12 Mini Cakes
 

Great mini cheesecakes. They look so decadent yet easy to make and taste delicious. Next time you want to impress your friends, make these.
Ingredients
For the cheese batter:
  • 250gr Cream Cheese (I used Philadelphia Light)
  • ½ cup Sugar
  • 2 Eggs
  • ½ tsp Vanilla Extract
For Blueberry layer:
  • ¼ cup Frozen (or Fresh) Blueberries
  • 1 tbsp White Sugar
For cake bottom:
  • 100gr (1 cup) Graham Cookies – Diced in food processor
  • 50gr Butter – Melted

Instructions
  1. Preheat oven to 350F (175C)
Make the graham cookie bottom:
  1. Mix diced cookies with melted butter until crumbs are fully coated with butter
  2. Grease muffin pan (each cup) with butter
  3. Divide mix evenly between 12 muffin cups in the muffin pan and tighten mix in each cup (I used the bottom of a glass to push the mix all the way down)
Make the cheese batter:
  1. Beat cream cheese, sugar, eggs and vanilla all together until smooth
  2. Remove ½ cup from cheese batter and set aside in a small bowl
Make the blueberry layer:
  1. In a small saucepan heat up blueberries and sugar over medium heat.
  2. Stir consistently until the mix thickens (5-7 minutes)
  3. Once a bit thick (should have a syrup consistency) remove from heat
  4. Add the fluids only to the ½ cup cheese batter you set aside earlier and mix together until even.
  5. Divide the blueberries left in the saucepan between the muffin cups. Place 1-2 (or whatever number of blueberries you have per cup) blueberries on each graham cookie layer in the muffin cups; Place in the middle.
Assemble the cakes:
  1. Dividing evenly, pour some of the purple cheese-blueberry batter you made into each muffin cup, on top of the blueberries.
  2. Gently, pour some of the white cheese batter (dividing evenly) on top of the purple cheese batter.
  3. Place in preheated oven for 20 minutes or until cake centers are almost set.
  4. Remove from oven and serve as is or upside down with the crumb layer being on top.

Notes
**These mini cakes can also be baked using muffin paper cups.


Mini Blueberry Cheesecake with berries

Mini Blueberry Cheesecake

I’m not sure why but I always though that cheesecakes are complicated and that’s why I tried avoiding them, although I just love cheesecakes, I mean, who doesn’t? So I decided to take advantage of the fact that these past few days were a Jewish holiday that focuses on eating dairy (“Shavuot”) and dived in,…

Read More

Baked Broccoli Feta Bites

Baked Goodies | Home Made Cooking 0

Shavuot is one of my favorite Jewish holidays. Shavuot commemorates the anniversary of the day the Torah (10 commandments) was given to the entire nation of Israel assembled at Mount Sinai. Now, that’s all nice and dandy but what I really like about the holiday is the food – obviously. You see, this holiday is being celebrated by serving dairy foods, fruits and vegetables and these are my favorite. Imagine the variety of things one can make and bake from dairy products. Also, it’s so much easier than chicken and meat.

So the first thing I made preparing for Shavuot was Broccoli Feta Bites. To be completely honest, I didn’t just make it because of the holiday, as always with my cooking, it was a combination of the upcoming holiday and what I had in the fridge, and this time I had a bag of fresh broccoli and no real craving for yet another quiche, so I came up with something that looks beautiful, made easy and tastes fantastic. The kids loved it (hey, it’s small food, what’s not to like) and we all enjoyed a nice light dinner with these bites and a big side salad – so good!


Breaded Broccoli Feta Bites


Broccoli Feta Bites
Author: 
Recipe type: Main, Appetizer
Cuisine: Vegetarian
Prep time: 
Cook time: 
Total time: 

Serves: 45 Bite Size Balls
 

Fun to eat, easy to make and healthy as an added bonus. Why not use your broccoli in a different way?
Ingredients
  • 650 grams Fresh (or frozen) Broccoli Florets
  • 2 Garlic Cloves – Diced
  • 2 Eggs
  • 7 tbsp Bread Crumbs
  • 100 grams Cheese – Grated (I used Cheddar)
  • 100 grams Feta Cheese – Crumbed
  • 2 tbsp Fresh Dill- – Chopped
  • 1 tbsp Dried Basil
  • Salt and Pepper to taste
  • ½ cup Bread Crumbs for Coating

Instructions
  1. Preheat oven to 375F (180C)
  2. Prepare large baking pan covered with parchment paper
  3. Place the ½ cup bread crumbs for coating in a small bowl and set aside for later.
  4. Cook the broccoli florets in a covered pot with boiling water. Cook for about 15 minutes.
  5. Drain the broccoli florets from water, place in a food processor and chop until diced.
  6. In a large bowl place the garlic, cheese, feta, dill, basil, bread crumbs and eggs and add in the diced broccoli. Mix all together until evenly combined.
  7. Scoop with teaspoon and roll into ping pong size balls.
  8. Roll in the bread crumbs you set aside for coating (1/2 cup) until fully coated and place on baking sheet.
  9. Once you’re done with all the balls, place in preheated oven for 25 minutes or until golden brown on the outside.
  10. Serve drizzled with tahini or with sour cream on top.


Breaded Broccoli Feta Bites

Breaded Broccoli Feta Bites

Shavuot is one of my favorite Jewish holidays. Shavuot commemorates the anniversary of the day the Torah (10 commandments) was given to the entire nation of Israel assembled at Mount Sinai. Now, that’s all nice and dandy but what I really like about the holiday is the food – obviously. You see, this holiday is…

Read More

Lava Chocolate Cakes from Chef Michael Smith – Sweet, Impressive and Gluten Free

Cakes and Cookies 1

It’s May. It’s spring. And for the past few days it’s been gorgeous! I must admit that there are days when I’m sitting in my office at work, looking out the window and wondering if we’re not missing out on too much in life. Not that trip overseas, not that final sale at the mall but everything that life and nature has to offer. For example, I feel I would be so much more happy working in my garden instead of typing contact lists, just enjoying the sunny day, or maybe cooking or baking something just because I like it and because my goal for the day would be to make the kids happy with something yummy. But instead of being a “child of nature” we have this thing called “Reality” where we need to work to get money so we can afford that garden we want to work in during these beautiful spring days. Reminder to self – I’m supposed to be a responsible adult! But hey, a girl is allowed to dream right? I should be thankful for what I have and not sorry for what I don’t. So as part of being thankful, I want to thank the person who discovered the chocolate, and to Chef Michael Smith. Why, you ask? Well…I love chocolate, in any shape, color, flavor or form and Chef Michael Smith had the exact thing I needed most – Molten Chocolate Cakes! Every time I used to order these at a restaurant I kept thinking that this must be so complicated to make. I mean, how do you bake something yet make sure it’s all soft and liquid on the inside? But surprise- surprise, it’s pretty easy, and simple, and very tasty! It’s also pretty quick to make and as an added bonus it’s gluten free so I gave it a shot. What can I say? It was sooo worth it.


Molten chocolate Cake - Lava Cake


Lava Chocolate Cakes from Chef Michael Smith
Author: 
Recipe type: Dessert
Cuisine: Desserts
Prep time: 
Cook time: 
Total time: 

Serves: 6-8 cakes
 

Molten Chocolate Cakes! Easy, Quick and so good! What a great way to impress someone.
Ingredients
  • 225 grams semi sweet or dark chocolate (I used semi-sweet chocolate chips)
  • ½ Cup Butter – Softened to room temperature
  • 2 tbsp Cocoa Powder
  • 4 eggs
  • ¼ Cup Sugar
  • 1 tbsp Vanilla Extract
  • Butter and sugar to spread and sprinkle on muffin cups

Instructions
  1. Preheat oven to 400F (200C)
  2. Melt butter and chocolate in a small saucepan (over low-medium heat)
  3. Once butter and chocolate have melted, remove from heat and add in the cocoa powder and stir until smooth
  4. In a mixer bowl or a medium size bowl, beat the eggs with sugar and vanilla extract until the mix is thick and smooth
  5. Pour the chocolate mix into the egg mix and stir until smooth
  6. Rub each muffin cup (mould) with butter and sprinkle with sugar. Shake any excess sugar out.
  7. Divide the batter evenly between the muffin cups. Make sure you fill about ¾ cup for each cake.
  8. Place in heated oven and bake for no more than 10 minutes. The cakes are ready when the tops are cracked and the inside is still a bit gooey.
  9. Cool for a few minutes (cakes will shrink a bit and pull away from the sides) and then take out of muffin cups. You can run a paring or butter knife along the edges to help loosen the cakes.
  10. Serve on a plate with whipped cream or ice cream.


Molten chocolate Cake - Lava Cake

Here’s the link to the original recipe: Michael Smith – Molten Chocolate Cakes

Molten chocolate Cake - Lava Cake

It’s May. It’s spring. And for the past few days it’s been gorgeous! I must admit that there are days when I’m sitting in my office at work, looking out the window and wondering if we’re not missing out on too much in life. Not that trip overseas, not that final sale at the mall…

Read More